Tuesday, September 04, 2018

Homemade Chia Jam

Hi everyone, I hope you had a wonderful summer and have enjoyed the mostly mild weather we had. Although ironically, this week is probably the hottest it's been all summer! That means I can try to sneak in some more summer recipes in the meantime. 😉

This is a recipe I'm really excited about. On the weekends, I love to have a piece of toast or a bagel with peanut butter and jam. But the thing about the jams and jellies are how high in sugar they are, and even the most organic wholesome versions have sugar as the first or second ingredient. Then there's the "sugar-free" versions and to be honest with you, I really don't like the sugar alternatives and feel they take away from the taste of the jam. So, I've been playing around with this and think I've landed on a recipe that's really quite tasty and of course super simple.

NOTE: I used honey as the sweetener for this recipe, but you can use maple syrup or even regular sugar if you want. And if you're OK with the sugar alternatives then go ahead use that instead. 

I think the most important part of this is making sure you're using a fruit that's "strong" in its taste, and also obviously that you enjoy eating on its own. As an example, I tried a version of this using mango. Now I love mango. If I had to choose one fruit to eat b a for the rest of my life, I'd choose mango. But using this in a jam didn't actually work out. The taste was a little too mild and it turned out to  a be a little bland. In my opinion, I think most of the berries would be the best choice for something of this nature.  I used blueberries for this particular recipe, but strawberries, blueberries, or raspberries would be awesome choices. I used frozen blueberries because that's what I had, but you could use fresh or frozen. 

The other thing I would note is that it may be a little difficult to immediately scale down to this not-as-sugary taste. If you need to you can take it slowly and reduce the sugar step by step until you don't need more than just a tiny bit! If you pick a nice ripe berry, you'll be really surprised at how naturally sweet it tastes to you. 

With all that being said, let's get this show on the road!

Ingredients:
16 oz fruit (blueberry, strawberry, raspberry etc.) - fresh or frozen
Juice of one small to medium lemon
1-3 tbsp honey (or sweetener of your choice) 
1-2 tablespoons Chia seeds

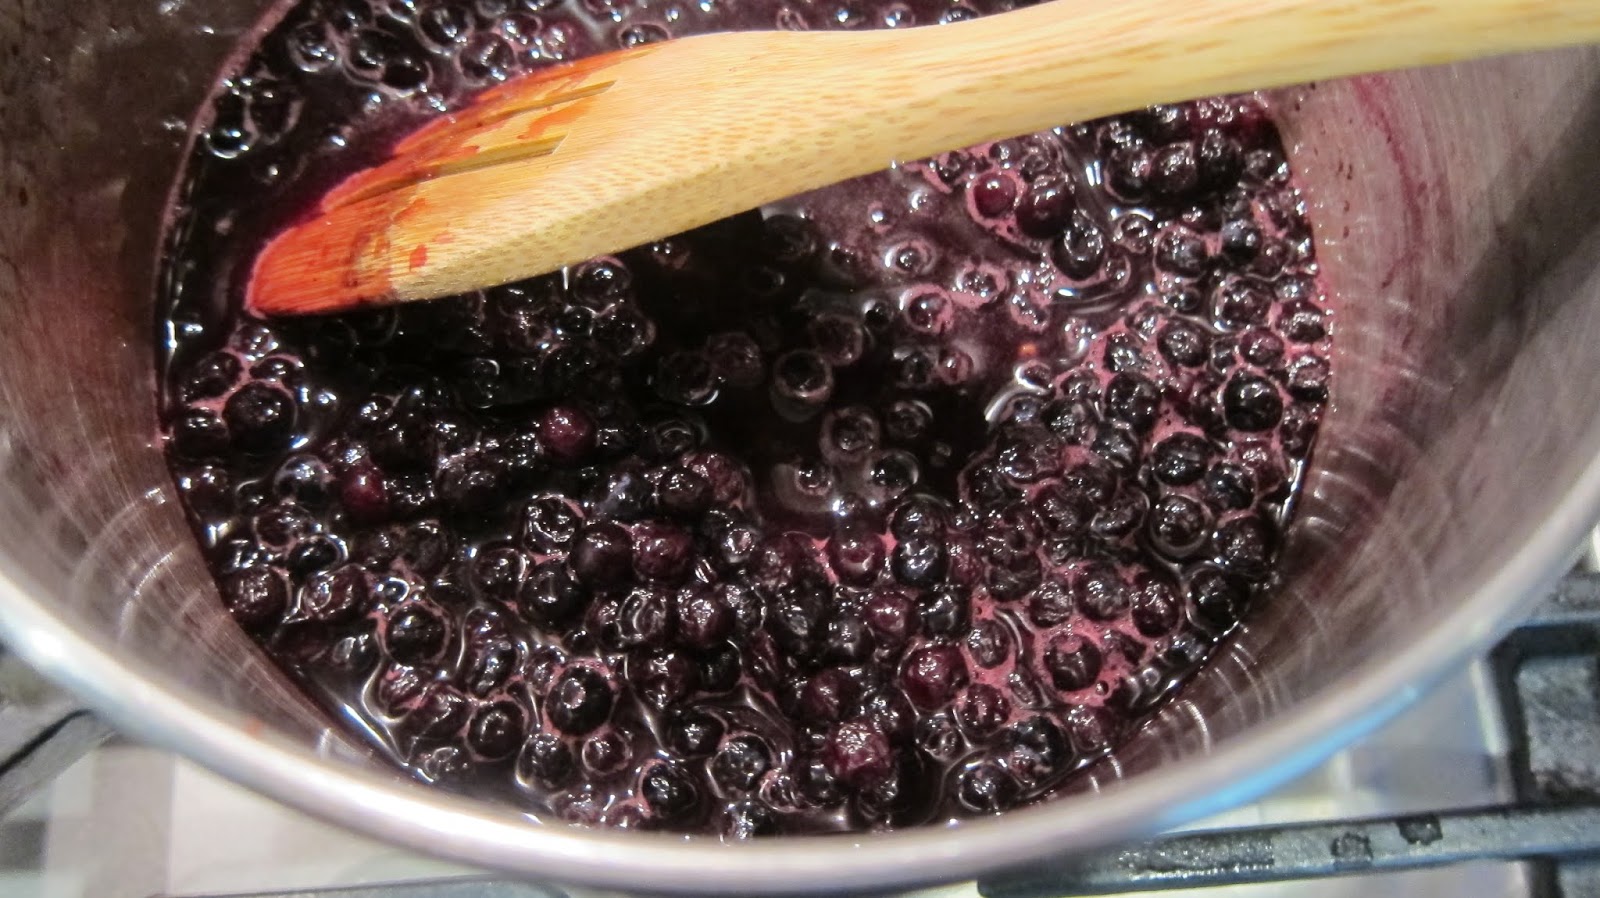
Step 1: Put fruit into a pot and put on stove on medium/high. 
I used the frozen wild blueberries from Trader Joe's, but feel free to use any brand, or fresh if you have it. 


Step 2: Add in the juice of one whole lemon.

Step 3: Add in the sweetener you are using.
I used 1 tablespoon of raw honey.
 Step 4: Stir and let it cook for 5-10 minutes on medium/low


Step 5:  Take some of the liquid that's started forming in the pot, and put it in a blender.

NOTE: If you don't mind the texture of the whole chia seeds, you can completely skip steps 5 and 6. 
I like the whole piece of fruit in my jam, so I only use a little bit for this step.
If you prefer a more jelly like texture you can puree the entire amount. 

Step 6: Add the Chia seeds into the blender and blend until the seeds have been pulverized into the liquid. I've noted you can use 1-2 tablespoons. I prefer a thicker jam, so I used 2 tablespoons. But if you want a more sauce/liquid type texture you only need 1.


Step 7: Add the chia mixture back into the pot of fruit and mix well.


Step 8: Pour into a thoroughly cleaned mason jar or container of your choice and refrigerate for at least 1 hour.


Step 9: Enjoy!!
This jam will stay fresh in your fridge for about 2 weeks.
It can also be frozen if needed for 2 months.  

Printable Recipe Card

Tuesday, June 19, 2018

Cold Brew Coffee


I love coffee. End of post. 😄

No seriously, I love coffee, in all forms and at any time of the day, although I do try to drink it in moderation for the most part. In the summer, there's nothing quite like an iced coffee to really brighten your day. Especially now that it's getting into those "feels like we're walking through soup" mornings, a cold glass of coffee hits the spot!

Last year, I noticed that every house I went to had something called cold brew coffee. I know, I was probably a year behind the trend. 😏 But anyway, so I went to the grocery store and decided to try it. I bought a few different brands, and they were all pretty good. "brewed" over a long period of time giving it a really smooth finish. Each one ran about $10. And there were probably 5-8 drinks worth in each bottle, so not a bad deal at all. But you know, I don't like to leave well enough alone. So after I finished the store bought versions, I decided to try making it myself. Well, not only was it super easy. But it's also super delicious AND super cheap. Plus you get to use your favorite brand of coffee and get exactly the taste you love! So are you ready? Let's do this!

Ingredients/Tools:
Coarsely ground coffee
Approximately 16-32 ounce Mason Jar or sufficiently large bottle with lid 
Filtered Water
Funnel 
Coffee Filter
Container to filter coffee into
Container to store coffee in the fridge


Instructions:

Note:  I used a 4:1 ratio for my coffee. So that means for every cup of coffee grounds, you'd use 4 cups of water. So to follow that, if you make 1 cup of coffee, you'd use 1/4 cup of coffee grounds...! It's that simple! This creates a pretty concentrated coffee so you can add in your milk or ice or just as is if you like shots of cold coffee!

Step 1: Decide how much coffee you're going to make. I'd suggest you start small in case for some crazy reason you don't like what you make. I did a larger batch this time, cause I knew I liked it. So I used 2 cups of coffee grounds. I had really large container, but if you have a 32 ounce mason jar or large enough bottle, that will work fine. 


Step 2: Add in 4x water. I had 2 cups of grounds so 4x2=8 cups of water.


Step 3: Let sit on your counter or fridge for 12-24 hours.I left mine on the counter. The longer you let it sit, the more concentrated it will be.

Step 4: Filter out the grounds. I did this in two steps and filtered with a mesh strainer, and then with a coffee filter. You could just try the mesh filter, but I found it left too much sludge in the coffee and I didn't enjoy it. 

Part 1)
I had another container of the same size so I knew all the coffee would fit
The strainer is lopsided....

Genius technique to hold a strainer that is lopsided. 😃
Part 2)
I saved the cold brew coffee bottles I'd purchased and just used them to hold the final product

Place a funnel on top of the bottle so there's no spillage, and then place the coffee filter inside the funnel

I had enough for two bottles, so I had them going at the same time. Aren't I just fancy! 
Step 5: At this point, if you already had it refrigerated or if you plan to put some ice in it, you can have some right away. Otherwise, refrigerate it for a couple hours and then enjoy!

I drink my coffee black, so I just added a bit of water to it. 

And then I also had some with ice! So delicious!

Thursday, May 17, 2018

Coconut Chickpea Curry


Ah the chickpea. It's one of my favorites among all the chicks. 😊 I think at this point everyone has had chickpeas - also known as a garbanzo bean - either as hummus, falafel, or in salads, or maybe even as a gluten free flour. But this dish here is one of my favorite things to do with chickpeas. The curry feels a bit decadent because of the creaminess of chickpea, but it's a fairly healthy dish, and not at all difficult to make. I doubt any of my curry dishes would be considered "authentic" but I think they taste pretty good so you'll have to give me a pass. 😉

And for those of you thinking, well where's the beef?! These humble legumes pack a good punch of protein, coming in at about 15 grams per cup (for your comparison, beef is about 22 for 3 oz and chicken is about 38 per cup). So it will keep you full for sure! What's stopping you! Let's do this!

Ingredients
1 tbsp coconut oil
1 large or 2 small onions
Shredded coconut
3 cloves garlic
1 tbsp fresh ginger
1/4 tsp ground turmeric
1/4 tsp black pepper
1/4 tsp cayenne pepper
1/4 tsp salt
1 tsp cumin
1 tsp curry powder
1 14 oz can diced  tomatoes
1 14 oz can coconut milk or cream
1 cup dried chickpeas or 2 -15 oz can chickpeas

Optional: If you want you can add in additional vegetables like zucchini or mushroom. Just cook them along with Step 3.


Step 1: If using dried chickpeas, you can optionally soak overnight (I recommend you absolutely do this if you're cooking it on the stove to save time), and then cook in either the instant pot or on the stove.
Step 1a: If using instant pot: rinse chickpeas, put into liner, fill water to a couple inches above chickpeas (use boiling water if you have any handy) set to manual, 35 minutes, natural release for 25 minutes, drain.  If using soaked chickpeas, reduce time to 13 mins.
Step 1b: If using the stove: rinse chickpeas, put into pot, fill water to a couple inches above chickpeas, and cook for approximately 1.5 - 2 hours, drain. If using soaked chickpeas, reduce time to 30-40 mins.
You'll notice the chickpeas I have are a brown as opposed to the beige that we normally see. This is a different variety of chickpea and is used in Indian cooking. I remember telling my mom a few years back that I used the regular chickpeas for making a curry, and she told me to stop and use the "right" ones. 😃 💓 So if you can find the brown ones, use them because they taste wonderful. Otherwise just use the regular ones. 
Step 2: Turn stove onto medium heat, and add coconut oil to a large pan.
Optionally you can use olive or vegetable oil if you prefer. 
Step 3: Slice onion(s), and add to pan. Stir and let cook for 5 minutes until onions are soft.
You can use any type of onion. We usually have a lot of red, so I used that. 
 Step 4: Add in shredded coconut and stir. You can use dry coconut but make sure it is plain and not the sweet stuff. Of course fresh tastes better if you can find it.


Step 5: I like to use the garlic press for most dishes, because I get lazy 😏 but you can also finely dice the garlic and the ginger. Add both to the pan along with the spices (turmeric, cayenne, salt, cumin, curry powder). Stir for a another minute.


Step 6: Add in the tomatoes and let cook for about 5 minutes.
You may notice that I cheated and used some fresh tomatoes because we had too many. I would have preferred the canned as I think they taste better in cooked meals, but this was pretty good too. 
 Step 7: Add in the coconut milk.
I use coconut cream (not to be confused with cream of coconut), because it's a richer product.
 Step 8: Finally, add in the cooked chickpeas and stir well.

At this point you just need to simmer on medium/low for 5-10 minutes to let the flavors meld.

Step 9: Serve over rice or with a naan bread and Enjoy!!

Thursday, April 26, 2018

Banana PB Oatmeal Cookies


So the BEST part of these cookies, other than the fact that they are scrumptdillyumptious, is that you can be on a diet, and still eat them! WHAT!? Yep, you heard me! I didn't add in any sugar (there is a bit in the choc chips, but you can skip that if you really want) and if you're gluten free you you have a few options to work with, and on top of that a lot of the ingredients are optional or interchangeable. Don't ever tell me I didn't do anything for you! :-D 

So I had a ton of bananas that seemed to be multiplying faster than we were eating them. So I knew I had to do something before they defeated me. And thus was born the Banana PB oatmeal cookies! Personally, I don't subscribe to the generally well accepted theory that baking is a science. I make up ratios and quantities all the time, and for the most part the recipes do fine. Granted, sometimes it's like Dr. Frankenstein came up with the recipes, but usually, we're ok. The reason I sad that is because I wanted to encourage you to substitute if you need to substitute, and don't be scared of having to be super precise. 

These cookies turned out so delicious and there's absolutely no sweetener involved, except for the bananas and chocolate chips if you decide to use them. Ok! With that, let's get this party started! 


INGREDIENTS
2 cups oats
4 ripe mashed bananas

Optional
1/2 cup peanut butter
1 cup flour
1/2 -1 cup chocolate chip cookies
1 tsp cinnamon
1 tsp vanilla extract
1/2 tsp salt
1 tsp baking soda
1 egg
1/4 cup nuts

Note: As you can see, most of these items are optional. Really you could get away with two ingredients - the oats and bananas to make a banana cookie - it would taste a lot like banana bread, but the texture would be a little different than a cookie with egg and flour etc.  


Step 1: Preheat oven to 400 degrees. 

Step 2: Mash together the banana and peanut butter. I had some peanut butter powder (nothing else added) that was just sitting around, so I used that instead of the regular creamy stuff. 
I used a hand mixer for the whole process. 
Step 3: Combine flour, baking soda,  cinnamon, salt, and oats. I used white whole wheat flour, but you can use any flour - coconut would be a nice flavor choice - or skip it altogether. Add to mashed bananas and combine well.


Step 4: Add in chocolate chips. This is an optional step, but it does add some sweetness and overall deliciousness to the cookie. Alternatively or in addition, you could add in some nuts of your choosing.


Step 5: Add in egg (this probably should have been done in the first step but I forgot)


Step 6: Using a cookie scoop or in my case a tablespoon because I couldn't find the scoop, place the batter onto baking sheets.


The cookies don't really flatten on their own, so if you don't want little dumplings, you should shape them flatter before baking. Also I ran out of parchment paper and used aluminum foil. I told you, this isn't a science :-)

Step 7: Enjoy! These taste great cold or warmed up and goes great with a cup of coffee!